Showing posts with label Rhinestone Basic Jewels. Show all posts

Monday

Time to DRESS UP! - Ladies' Card


Hi, everyone!

Having made a waistcoat card last week for our imaginary dapper gentleman, I thought it was time to make one for our imaginary elegant lady - one who loves to dress up! And what better set to use for this occassion than DRESS UP (p.67 in the Annual Catalogue) - 8 stamps, perfect for ladies or young girls/teenagers' cards - lipstick, nailvarnish, handbag, necklace... the lot!
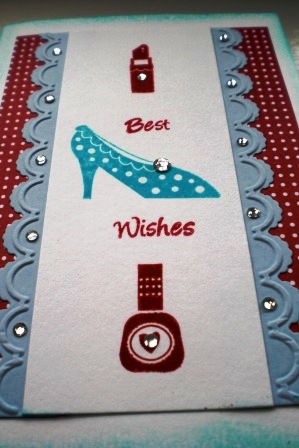
I had fun making these cards, though some of you might find my usage of the 'red' colour quite BOLD. But hey, this is a lady who's confident, energetic, full of life and vitality! And she's imaginary, remember, so I am forgiven... :-)

Let me know what you think, anyway...

Thanks for visiting, and drop by again soon! xxx

Products used: All Stampin'Up! otherwise stated:
Stamps: Dress up (clear mount), Petite Pairs (clear mount)
Inks: Real Red, Tempting Turquoise
Cardstock: Whisper White, Summer Smooches Designer Series Paper
Accessories: Big Shot Machine, Adorning Accents Edgelits, Adorning Accents Folder, Rhinestone Basic Jewels, Brights Designer Buttons.

The small flower punch was from Woodware Craft Collection.


Create your own 'mask' card with Smooch Spritz!

I made this card at our training day a couple of weeks ago. It was a project designed by the lovely Monica Gale, independent Stampin'Up! demonstrator, and a very effective project it was, too!
First, you make a mask using vellum card stock and some framelits. The one we used here was the Delicate Doilies Sizzlits L - very pretty! Position this on to some dark-coloured card with a very thin layer of glue, and spray with Smooch Spritz Vanilla Shimmer. Gently peel off the mask, and you should have a delicate doily smiling back at you!
Next, add all the layers together (Chocolate Chip cardstock, Rich Razzleberry cardstock, and First Specialty Designer Series Paper), and rip across in one go, then glue them to the card base. Make a little dimensional embellishment using the 7/8" Scallop Circle punch and a strip of Glimmer Paper, and top with a butterfly (using the Bitty Butterfly punch). Stamp the sentiment (from the Vintage Verses stamp set, free during Sale-a-bration 2013), in Rich Razzleberry ink, adhere in place using 3-D Dimensionals, and embellish further with some tiny punched flowers using the Itty Bitty Shapes Punch Pack.
Let me know what you think. Stop by again soon for some more training day projects. Thanks for visiting!

Other materials used: Rich Razzleberry 1/4" Stitched Grosgrain Ribbon, Rhinestone Gems.

Wednesday

Sale-a-bration 2013! Patterned Occasions


Hello again!
This card showcases the new Patterned Ocassions stamp set which can be yours for FREE, courtesy of Sale-a-bration 2013, when you spend £45 from the annual catalogue or the new Spring/Summer catalogue that's out on 1st February.
For more details of this offer and other Sale-a-bration-related news, please click here . For a list of the freebies you could be earning between now and 22nd March, click here Do contact me either by phone or email, and I'd be more than happy to assist you in putting in an order, and benefiting from this excellent promotion.
Back to the card: First, I embossed it, using the beautiful Elegant Bouquet Embossing Folder on the Big Shot, then I stamped the elephant image directly onto the card in Pink Passion ink (now retired, though the current Melon Mambo ink pad would do just as well). I randomly stamped a couple of small butterflies from the Papillion Potpourri stamp set in Tempting Turqouise ink, and added a much bigger, stamped and punched out butterfly from the same set, using the Elegant Butterfly punch, and positioning it on top of the card, with some 3-D Stampin' Dimensionals, as if resting on one of the design's branches. I decorated both the butterflies and the elephant image with some Rhinestone Basic Jewels, and added some tiny, blue and pink circles (punched out of paper) to the inside of the flowers, for some extra colour. What do you think?
This other card is made using the same stamp set as the one above (Patterned Occasions), but the image is different, a cupcake instead of an elephant, and a 'Happy Birthday' greeting, instead of a 'Thank You' one. As you can see, the creations you can come up with using this multi-purpose set are endless.
In the next few days, I hope to show you some more projects I've made using some other, lovely Sale-a-bration products. Thanks for stopping by, and visit me again soon!