Wednesday

Birthday Card Voucher Holder, and...Cake!

I  made this voucher holder for the lovely Jackie, my friend, neighbour, and loyal customer (in that order!)

It was Jackie's birthday this week, and her just as lovely daughter, Kate, and her sister, knowing how much their mum LOVES Stampin'Up! products, made sure she gets a nice surprise on the day.


And this is what the card held inside! Needless to say, Jackie was made up with the gift. What a treat! I am sure she'll have even more fun now choosing something from the catalogues!


And, to top it all off, right in time for our afternoon tea, Kate brought us some chocolate cake which Jackie lovingly made - I knew she wasn't good at just making cards only!

It was DELICIOUS- I want the recipe, Jackie!

In moments like this, I just LOVE being a Stampin'Up! demonstrator!

Happy Birthday, Jackie, and the very best of wishes!

Have you told your loved ones lately how much you appreciate them? Do it today!

xx

Materials used:
Stamp Set: Petite Pairs
Inks: Rich Razzleberry Classic Stampin' Ink Pad
Cardstock: Whisper White, Summer Smooches Designer Series Papers (retired)
Accessories: Rich Razzleberry Grosgrain Stitched Ribbon, White Creped Filter Paper, Vintage Brads
 

Monday

With Heartfelt Sympathy - Close As A Memory!


Hello!

I was playing around with the Summer Silhouettes stamp set the other day, and ended up making this sympathy card.

Elegant butterflies go well with this set, and I placed white vellum butterflies on top of the punched-out Wisteria Wonder card ones, as well as thin silver strips of Glimmer Paper to make them stand out and look even prettier.

The silver ribbon was from my own stash of ribbon.

The card edge was effortlessly created using the Adorning Accents Edgelits and matching Adorning Accents Embossing Folder on the Big Shot.

The sentiment is from the now retired Close As A Memory stamp set.

Indeed, Earth has no sorrow that Heaven cannot heal!

So true and comforting!


All materials from Stampin'Up! unless otherwise stated:
Stamps: Summer Silhouettes, Close As A Memory
Inks: Old Olive, Apricot Appeal, Early Espresso
Cardstock: Whisper White, Wisteria Wonder, Glimmer Paper (Silver), White Vellum,
 Accessories: 3-D Dimensionals, Adorning Accents Edgelits, Adorning Accents Embossing Foder

Tuesday

Patterned Occassions - Sale-a-bration 2013 - 'Get Well' Card

I really like the Patterned Occassions set you can have for FREE during the Sale-a-bration period with every £45 order from either of the catalogues.

So here's a card I made using this set - "recover rapidly" it says. Lots of colorful images of plasters scattered around the card, some beautiful designer paper (Summer Smooches), 1/4" stitched grosgrain ribbon (Pacific Point colour), and the sentiment inked with a couple of Stampin'Write markers (Brights Collection) - couldn't be easier!

It should cheer up anyone who's feeling poorly today - speedy recovery to you!

And don't forget! Not long to go 'till Sale-a-bration season comes to an end - 22nd March is the date. So go on, and stock up on those freebies! You know you want them!

See you again soon!
x

All materials from Stampin'Up! unless otherwise stated:
Stamps: Patterned Occassions (free during Sale-a-bration 2013)
Inks: Real Red, Tempting Turquoise, Old Olive, Melon Mambo, Apricot Appeal
Cardstock: Whisper White, Pacific Point, Summer Smooches Designer Series Paper
Accessories:Pacific Point 1/4" Stitched Grosgrain Ribbon, 3-D Dimensionals

Monday

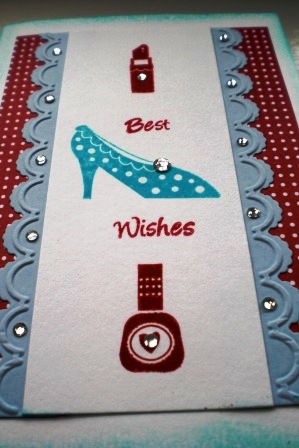
Time to DRESS UP! - Ladies' Card


Hi, everyone!

Having made a waistcoat card last week for our imaginary dapper gentleman, I thought it was time to make one for our imaginary elegant lady - one who loves to dress up! And what better set to use for this occassion than DRESS UP (p.67 in the Annual Catalogue) - 8 stamps, perfect for ladies or young girls/teenagers' cards - lipstick, nailvarnish, handbag, necklace... the lot!

I had fun making these cards, though some of you might find my usage of the 'red' colour quite BOLD. But hey, this is a lady who's confident, energetic, full of life and vitality! And she's imaginary, remember, so I am forgiven... :-)

Let me know what you think, anyway...

Thanks for visiting, and drop by again soon! xxx

Products used: All Stampin'Up! otherwise stated:
Stamps: Dress up (clear mount), Petite Pairs (clear mount)
Inks: Real Red, Tempting Turquoise
Cardstock: Whisper White, Summer Smooches Designer Series Paper
Accessories: Big Shot Machine, Adorning Accents Edgelits, Adorning Accents Folder, Rhinestone Basic Jewels, Brights Designer Buttons.

The small flower punch was from Woodware Craft Collection.


Sunday

Waistcoat Card - Dapper Dad

Hello, and welcome to this blog hop, which is all about the BRAND NEW Spring/Summer Catalogue 2013 and the lovely products featured in it!

A very special welcome to those readers who have just joined me from Emily's BLOG! Thanks for visiting.

Today I'd like to share with you a card I made this week using the BRAND NEW Dapper Dad Stamp Set from the afore-mentioned catalogue (p.14). 

As the word "dapper" suggests, this card would suit a smartly-dressed, well-turned out gentleman, and I trust you already have a few of these in amongst your own circle of friends and family who would appreciate receiving such a card! :-) 

If you're anything like me, wondering what materials to use for men's cards, which (let's face it) can be tricky to make at times, then this set is for you! There are three stamps that go with it - a bow tie, a shoe, and a watch. There's so much you can do with these three images, from Father's Day cards to retirement cards, etc.

Here' s a simple, step-by-step, "all-you-need-to-know" guide about how to make today's card:

1. Cut out the waistcoat shape (according to the measurements shown in the picture) from Polka Dot Parade Designer Series Papers. (My card, by the way, measured 14.5cmx10cm or roughly 6"x4").

2. Trim away the diagonal portions at the top of the card, to give it the impression of "shoulders". Cut a 3cm slit in the centre of the top of the card and fold back two triangles to form the collar.

3. Cut and stick down two small strips of scrap Early Espresso cardstock to form the pockets on the waistcoat. 

4. Ink up the bow tie stamp in Early Espresso Ink (though you can use any other colour you like, making sure the paper you use for the "pockets" match the colour of the bow tie, otherwise our imaginary gentleman won't be as "dapper" as we first thought he was!)

5. Stick the bow tie down, just under the collar, and add three Neutrals Designer Buttons down the centre of the waistcoat to finish.

So, there you have it. Our gentleman is now ready to go out and face the world!

Thanks for 'hopping' by! I hope to see you again very soon.

Click here to visit the next person on the blog hop (hello, Erika!), and if you want to be inspired by some more Spring/Summer Catalogue creations, why don't you go ahead and 'hop' back to the Beginning of this BLOG HOP and carry on till you've visited all 14 posts. Enjoy! :-)


Products used: All Stampin'Up! unless otherwise stated
Stamps: Dapper Dad Set (Clear Mount) - Spring/Summer Catalogue
Inks: Early Espresso
Card stock: Whisper White, Early Espresso, Polka Dot Parade Designer Series Paper
Accessories: Neutrals Designer Buttons (Early Espresso)

Monday

Create your own 'mask' card with Smooch Spritz!

I made this card at our training day a couple of weeks ago. It was a project designed by the lovely Monica Gale, independent Stampin'Up! demonstrator, and a very effective project it was, too!
First, you make a mask using vellum card stock and some framelits. The one we used here was the Delicate Doilies Sizzlits L - very pretty! Position this on to some dark-coloured card with a very thin layer of glue, and spray with Smooch Spritz Vanilla Shimmer. Gently peel off the mask, and you should have a delicate doily smiling back at you!
Next, add all the layers together (Chocolate Chip cardstock, Rich Razzleberry cardstock, and First Specialty Designer Series Paper), and rip across in one go, then glue them to the card base. Make a little dimensional embellishment using the 7/8" Scallop Circle punch and a strip of Glimmer Paper, and top with a butterfly (using the Bitty Butterfly punch). Stamp the sentiment (from the Vintage Verses stamp set, free during Sale-a-bration 2013), in Rich Razzleberry ink, adhere in place using 3-D Dimensionals, and embellish further with some tiny punched flowers using the Itty Bitty Shapes Punch Pack.
Let me know what you think. Stop by again soon for some more training day projects. Thanks for visiting!

Other materials used: Rich Razzleberry 1/4" Stitched Grosgrain Ribbon, Rhinestone Gems.

Wednesday

Sale-a-bration 2013! Patterned Occasions


Hello again!
This card showcases the new Patterned Ocassions stamp set which can be yours for FREE, courtesy of Sale-a-bration 2013, when you spend £45 from the annual catalogue or the new Spring/Summer catalogue that's out on 1st February.
For more details of this offer and other Sale-a-bration-related news, please click here . For a list of the freebies you could be earning between now and 22nd March, click here Do contact me either by phone or email, and I'd be more than happy to assist you in putting in an order, and benefiting from this excellent promotion.
Back to the card: First, I embossed it, using the beautiful Elegant Bouquet Embossing Folder on the Big Shot, then I stamped the elephant image directly onto the card in Pink Passion ink (now retired, though the current Melon Mambo ink pad would do just as well). I randomly stamped a couple of small butterflies from the Papillion Potpourri stamp set in Tempting Turqouise ink, and added a much bigger, stamped and punched out butterfly from the same set, using the Elegant Butterfly punch, and positioning it on top of the card, with some 3-D Stampin' Dimensionals, as if resting on one of the design's branches. I decorated both the butterflies and the elephant image with some Rhinestone Basic Jewels, and added some tiny, blue and pink circles (punched out of paper) to the inside of the flowers, for some extra colour. What do you think?
This other card is made using the same stamp set as the one above (Patterned Occasions), but the image is different, a cupcake instead of an elephant, and a 'Happy Birthday' greeting, instead of a 'Thank You' one. As you can see, the creations you can come up with using this multi-purpose set are endless.
In the next few days, I hope to show you some more projects I've made using some other, lovely Sale-a-bration products. Thanks for stopping by, and visit me again soon!

Friday

Elegant butterfly and Summer Silhouettes!


Happy New Year to you all!
I know it’s winter, and a stamp set like Summer Silhouettes makes summer sound like a long, long way off, but hey, that’s what creativity does to you! It makes you dream of sunny days, of bees and butterflies, of love and laughter… Before we know it, the buds on the trees will blossom again, and nature will sing its beautiful summer melody like it always does at that time of year.
I wanted to show off the Polka Dot Parade Designer Papers, so I used the Adorning Accents Edgelits and Adorning Accents Folder with the Big Shot machine to create a pretty edge on each side of the card – just big enough to see the paper through.

The vase is made using the Ornament punch (great not only for Christmas cards then!), to punch out the shape from the back of the same blue, dotted paper used on the edge of the card. Just snip off the bottom the ornament shape, and ‘Voila, you have a vase’!
The butterfly is from the Papillon Potpourri stamp set, and I raised it up using the Elegant Butterfly punch, and some 3-D Dimensionals.
In keeping with the light, fragile, and earthly nature of butterflies, I preferred using Baker’s Twine to ribbon, both on the side of the card, and on the button.
The greeting is from the Petite Pairs stamp set.
Here’s another card, using the same Summer Silhouettes stamp set, this time as a ‘Thank You’ card with a sentiment from the same Petite Pairs stamp set. The ribbon is Pretty in Pink. Inks used: Old Olive, Real Red, Tempting Turquoise, and Pink Passion (now retired). Nice, if I may say so myself!

Monday

Papillion Potpourri and the New Year!


The New Year is almost here, and what better way to celebrate it than with a couple of butterfly cards! Ah, the fragile, yet gracious butterfly - the symbol of new life, new beginning! And that’s what the New Year is all about, isn’t it?
The stamp set is one that I fell in love with the moment I opened the 2012-13 annual catalogue – Papillion Potpourri. So pretty and useful for so many different occasions, from birthdays to ‘Get Well’ and ‘Thank You’ cards.
To make the most of this set, you’ve got to have the Elegant Butterfly punch, which is what I’ve used here, having stamped the butterfly image first on to some Whisper White cardstock, then punched it out, and mounted it on to the card topper, using 3-D Dimensionals.
And if you’re anything like me, you might like to take coordination on to the next, higher level. I believe there’s another smaller, Bitty Butterfly punch coming out in February, with the new Spring-Summer 2013 Catalogue (p.13), which goes really well with the smaller butterfly stamp of the Papillion Potpourri set. Isn’t that brilliant?
To finish off the card you could add a sentiment – I went for ‘Happy Birthday Wishes’ from the Petite Pairs stamp set.
The buttons add a nice touch to the butterflies’ bodies, and Stampin’Up’s own buttons are perfect for this.
Alternatively, you could use Rhinestone Gems, which is what I’ve used on the second card. The sentiment on this is from a beautiful, unfortunately now retired, set called Vintage Vogue. “You raise kindness to an art” – how lovely to be able to say that to someone who deserves your thanks!

I don’t yet possess a Stampamajig, but if I did, I’d have horizontally stamped up the three butterfly images using this very useful tool, though the way I’ve done it (i.e. not in a straight line), doesn’t look too bad. What do you think? After all, butterflies fly where and how they please!
May your New Year be a happy, healthy and successful one! May all its joys and surprises, as well as its trials and challenges, help you grow stronger in body and spirit. Life is indeed like a butterfly. Treasure it while it lasts!

Christmas cards again - Delightful Decorations and Be of Good Cheer!


Hello again!
This is another Christmas card I made using the Delightful Decorations stamp set, and the Ornament and ¾” Circle punches.
I started by stamping the background with one of the set’s snowflake circle stamps in Old Olive ink. Then I centrally layered a red rectangle (using Real Red cardstock), and on top of it, another white rectangle from Whisper White cardstock. I’d previously stamped half of this rectangle using another snowflake circle stamp (again in Old Olive ink), and the other half I covered with a piece of designer paper from the Be of Good Cheer series, which I really like.
Then I stamped and punched out one of the ornaments, as well as a ¾” circle (using the last of the snowflake stamps), and mounted these on to the card using 3-D Dimensionals, to give them some height.


 To finish off the card, I used some Baker’s Twine for the ornament, as well as around the middle of the white rectangle, where it joins the paper.
And no card is complete without a greeting, so this one came from the Petite Pairs stamp set, which coordinates well with the ‘Merry Christmas’ snowflake stamp already mounted on the ornament.
Quick and easy! What do you think?  
Staying with the Christmas theme, here are two more simple cards, which I made using the Snow Festival Printed Tags from the Seasonal Catalogue.
The papers are (again!) from Be of Good Cheer Designer Paper Series, and the circles (on the second card) are stamped using the Delightful Decorations stamp set, and the ¾” Circle punch.
I applied some Rhinestone Gems on one of the cards, as well as a Christmas greeting from the Petite Pairs stamp set. Simple!
Happy Christmas, everyone!

Sunday

Christmas is almost here - Delightful Decorations and Be of Good Cheer!

Preview
Hello!
With Christmas celebrations just round the corner, it's time to showcase some hand-made cards which capture the spirit of the season. So here I go...
I made this card using one of my favourite Christmas stamp sets from the annual catalogue - Delightful Decorations. It makes quick and easy cards, especially when used in conjuction with two coordinating punches, the Ornament Punch, and the 3/4" Circle Punch.
I also used some lovely papers from the Designer Paper Series, called Be of Good Cheer - these are double-sided and so pretty. Had a hard time deciding which side to go for!
I stamped the Christmas greeting using the Petite Pairs stamp set. As the name suggests, this set's stamps come in pairs. So I stamped 'Merry Christmas' on the outside of the card, and the matching sentiment pair I stamped on the insert of the card, so it read, 'and a Happy, Joyful, Bright New Year'. I finished off the card by adding some ribbon and a bow three-quarters of the way down the card (Pretty in Pink 1/4" Stitched Grosgrain Ribbon), some clear, self-adhesive rhinestones on to the baubles, as well as some elasticated ribbon (Stampin' Up!'s Baker's Twine will do), and I also stamped snowflake images (which come with the Delightful Decorations set) on the left-hand side of the card to give it a quirky look!
Have made quite a few of these cards at my workshops lately, and am pleased to tell you that I'm not the only one liking this particular Christmas set!
Here's another card made using this set. Similar design, but different colours. Preview
Let me know what you think...
I'll be back again with yet more Christmas cards...
Thanks for stopping by!